Tuesday, January 31, 2012

Southwestern Scallops

When I saw this recipe I knew I had to try it. I absolutely love scallops and have never made a Sea Scallop recipe.  I was a little uneasy at first about cooking them properly but this recipe was very simple.  I will definitely make this recipe again!

Southwestern Scallops

Yield: 4 servings

2 tsp. chili powder
1/2 tsp. ground cumin
1/4 tsp. salt
1/8 tsp pepper
1 lb. sea scallops (about 12)
2 Tbsp. butter, divided
1/2 Cup white wine of chicken broth

In a small bowl, combine the chili powder, cumin, salt and pepper.  Pat Sea scallops dry with a paper towel.  Rub seasoning mixture over top and bottom of scallop.
In a large heavy skillet over medium heat, melt 1 Tbsp butter.  Cook scallops for 2 minutes on each side or until golden and opaque.  Remove from the skillet, keep warm.
Add wine or broth to skillet, stirring to loosen any browned bits from pan.  Bring to a boil; cook until liquid is reduced by half.  Stir in remaining butter until melted.  Serve with scallops.


Make sure you buy SEA scallops and not bay scallops for this recipe.  Sea scallops are from 1 1/2 to 2 inches wide and are much bigger than bay scallops.  I would do a few things differently with this recipe from when I made them the first time.  I would just put the seasoning on the top and bottom of the scallop instead of all over it.  The recipe was not very clear on the coating part of the scallops.  I also cooked mine a bit longer than 2 minutes on each side.  I wanted to make sure they were cooked but not dried out.  I would also make sure that the broth is reduced enough.  I got impatient with it and stopped cooking it too soon. The broth was very good and would like it a bit thicker.  I used the chicken broth instead of the wine also.  Enjoy!

Green Bean Mushroom Pie

I decided to try this recipe as a side dish to my main course.  I like fresh green beans so I thought I would love this recipe.  It was time consuming to make but the outcome was very nice to look at.  I'm sad to say that I did not like this recipe, not because of the taste, but because I really do not like fresh mushrooms. The overall flavor was good though.  The biggest complaint my boyfriend had was that there was no meat in this pie. 

Green Bean Mushroom Pie

Yield: 8-10 servings

Filling:
3 Cups sliced fresh mushrooms
4 Tbsp. butter, divided
2 1/2 Cups chopped onion
6 Cups cut fresh green beans (1-inch pieces)
2 tsp. minced fresh thyme or 3/4 tsp. dried thyme
1/2 tsp salt
1/4 tsp pepper
1 pkg. (8 oz) cream cheese, cubed
1/2 Cup milk

Crust:
2 1/2 Cups all-purpose flour
2 tsp. baking powder
1 tsp. dill weed
1/4 tsp. salt
1 Cup cold butter
1 Cup (8 oz) sour cream
1 egg
1 Tbsp. heavy whipping cream

In a large skillet, saute mushroom in 1 Tbsp butter until tender; drain and set aside.  in the same skillet, saute onions and beans in remaining butter for 18-20 minutes or until beans are crisp-tender.  add the thyme, salt, pepper, cream cheese, milk, and mushrooms.  Cook and stir until the cheese is melted. Remove from the heat; set aside.
For crust:  In a large bowl, combine the flour, baking powder, dill and salt.  Cut in butter until mixture resembles coarse crumbs.  Stir in sour cream to form a soft dough.
Divide dough in half.  on a well floured surface, roll out on portion to fit a deep-dish 9-inch, pie plate; trim pastry even with edge.
Pour green been mixture into crust.  Roll out remaining pastry, make a lattice crust.  Trim, seal and flute edge. 
In a small bowl, beat the egg and cream; brush over lattice top. Bake at 400 degrees fro 25-35 minutes or until golden brown.


I pretty much stuck to the original recipe with this one.  I did not use dill weed in the crust as I'm not a big fan of dill weed.  The crust was still very flavorful due to the sour cream.  I ended up saving the leftover crust for the next day and made small biscuits.  They turned out pretty good too!  I also used dried thyme.  I will admit I messed up on the lattice work on top but could not fix it in time. If these ingredients sound good to you then I would suggest making this pie.  Please let me know what you think!  Enjoy! 

Saucy Italian Roast

Next on the list of food to try was this recipe for a roast.  I have mixed feelings about roasts because sometimes they are too bland or too dry.  I saw this roast and thought that the ingredients looked pretty good.  I was going to have a "date" with my future sister-in-law and decided to make this!  This turned out really good!  The meat was very tender and there was a lot of flavor.  The sauce part was great once it coagulated some over the noodles!

Saucy Italian Roast

Yield: 8-10 Servings

1 boneless rump roast (3-3 1/2 lbs)
1/2 to 1 tsp salt
1/2 tsp garlic powder
1/4 tsp pepper
1 jar (4 1/2 oz) sliced mushrooms, drained
1 medium onion, diced
1 jar (14 oz) spaghetti sauce
1/4 to 1/2 Cup red wine or beef broth
Hot cooked pasta

Cut the roast in half.  Combine salt, garlic powder and pepper; rub over roast.  Place in a 5-qt slow cooker.  Top with mushrooms and onion.  Combine the spaghetti sauce and wine or broth; pour over meat and vegetables.  Cover and cook on low for 8-9 hours or until meat is tender.  Slice roast; serve over pasta with pan juice.

I used beef broth for this recipe as I did not have any wine.  I thought there was plenty of flavor and as the sauce cooled over the noodles it became more delicious.  I will definitely make this recipe again.  Enjoy!

Tuesday, January 24, 2012

Taco Puffs

This is the second meal of the week!  I got these out of the new cookbook my boyfriend bought for me for Christmas!  I love all things that have to do with tacos so I wanted to try these ASAP!  I got home a bit later from work today so I decided we would have these as they are relatively quick to make!  They turned out to be very quick and easy to make!  After they were in the oven they were done in no time!  I will definitely be making these again!

Taco Puffs

Yield: 8 servings

1 lb. ground beef
1/2 Cup chopped onion
1 envelope taco seasoning
2 tubes (16.3 oz each) large refrigerated flaky biscuits
2 Cups (8oz) shredded cheddar cheese

1.  In a large skillet, cook the beef and onion over medium heat until meat is no longer pink; drain.  Add the taco seasoning and prepare according to package directions. Cool slightly.
2.  Flatten half of the biscuits into 4-inch circles; place in greased 15-in x 10-in x 1-in backing pans.  Soon 1/4 Cup meat mixture onto each; sprinkle with 1/4 Cup shredded cheese.  Flatten the remaining biscuits; place on top and pinch edges to seal tightly.  Bake at 400 degrees for 15 minutes or until golden brown. 

There turned out delicious!!!  The taste of the biscuit with the taco meat and cheese was awesome!  I would recommend these to everybody! My boyfriend liked to dip his in salsa.  I served these with a taco rice mixture I like to make.  It includes white rice, the leftover taco meat and onion from the taco puffs, cheddar cheese and salsa!  This was a great side dish to have with these.  These were fun and easy to make and I will make them again with different filling too!  Enjoy!

Monday, January 23, 2012

Potato Chowder

One of my New Years resolutions was to start cooking more again.  Last week I went through my cookbooks and wrote down everything I was going to make in the next 2 weeks.  I went out and bought all the ingredients for everything!  The first thing I decided to make was a potato chowder.  This recipe came from my slow cooker recipe book! 

Potato Chowder

Yield: 12 Servings (3 Quarts)

8 Cups diced potatoes
1/3 Cup chopped onion
3 cans (14 1/2 oz each) chicken broth
1 can (10 3/4 oz) condensed cream of chicken soup, undiluted
1/4 tsp pepper
1 package (8oz) cream cheese, cubed
1/2 lb. sliced bacon, cooked and crumbled (optional)
snipped chives (optional)

In a slow cooker, combine the first five ingredients. Cover and cook on low for 8-10 hours or until potatoes are tender.  add cream cheese; stir until blended.  Garnish with bacon and chives if desired.


This recipe was very simple to make!  I diced the potatoes and onion the night before and combined it all in the morning before work.  By the time I came home the potatoes were all cooked and it was ready for the cream cheese.  I cooked the bacon while the cream cheese mixed in.  This soup was rich and creamy and delicious. The only thing I did differently was add a little garlic powder and salt to the soup.  I also made chicken sandwiches to go with the soup.  The ingredients include: Hamburger rolls, Breaded chicken breasts, mayo, lettuce, sliced American cheese, and bacon!  This was a great dinner to end a long day of work!  Enjoy!

Broccoli and Noodles Supreme

I have made this recipe before and I really liked it, so I decided to make it again.  It's quick and easy to make and its just a good recipe to have when you want to make a complete meal/casserole.  I love to try and make new casseroles and play around with ingredients and ways to prepare them faster.  This is one of these casseroles where you really cannot mess up if you play around with it a bit!

Broccoli and Noodles Supreme

Yield: 6 servings

1 can (10 3/4 oz) Condensed Cream of Chicken Soup
1 Cup Milk
1/8 tsp. ground black pepper
1/2 Cup sour cream
1/3 Cup grated Parmesan cheese
2 Cups fresh or frozen broccoli flowerets
2 Cups uncooked medium egg noodles

1.  Stir the soup, milk, pepper, sour cream, cheese, broccoli and noodles into a 2-quart casserole. Cover
2.  Bake at 400 degrees Fahrenheit for 15 minutes. Stir
3.  Bake for an additional 15 more minutes or until hot and bubbly.

I do a few things differently with this recipe to make it more hearty and cook quicker.
1.  I absolutely cook the noodles before baking the whole casserole.  I partially boil them, still leaving them a bit hard.  This speeds up the baking process and ensures that the noodles are cooked all the way. 
2.  I also add chunks of chicken breast.  I buy boneless, skinless chicken and just bake through all the way.  I add this into the casserole with everything else.
3.  I mix the wet ingredients together in a separate bowl first and then add the Parmesan cheese to it.  I mix the chicken, noodles, and broccoli together and then add the wet mixture.
4.  I use a whole bag of frozen broccoli not just 2 Cups.
5.  I add an extra 1/2 can of cream of chicken soup if I need more of the sauce due to the additional ingredients I put in!  I like my casseroles a bit juicy!  If you add the extra sauce, just make sure you let the casserole sit before you serve.
6.  Lastly, I sometimes add Ritz cracker crumbs to the top of the casserole.  I enjoy the taste and the crunch of the crackers on top!  Enjoy!

Monday, January 2, 2012

Bacon Cheeseburger Balls

My boyfriend bought me another cookbook for Christmas so I had to try out a recipe from it.  We had to go to a New Years party and I had to make an appetizer.  My boyfriend chose this recipe to try out.  These are a bit time consuming to make but well worth it in the end!

Bacon Cheeseburger Balls

Yields: 3 Dozen

1 egg
1 envelope onion soup mix
1 lb. ground beef
2 Tbsp. all-purpose flour
2 Tbsp. milk
1 Cup (4 oz.) shredded cheddar cheese
4 bacon strips; cooked and crumbled

Coating:
2 eggs
1 Cup crushed saltines (about 30 crackers)
5 Tbsp. canola oil

In a large bowl, combine the egg and soup mix.  Crumble beef over mixture and mix well.  Divide into 36 portions and set aside.  In another large bowl, combine the flour and milk until smooth.  Add the cheese and bacon; mix well.
Shape cheese mixture in 36 balls.  Shape one beef portion around each cheese ball.  In a shallow bowl, beat the eggs.  Place cracker crumbs in another bowl.  Dib meatballs into egg, then coat with crumbs.
In a large skillet, cook meatballs over medium heat in oil for 10-12 minutes or until the meat is no longer pink and coating is golden brown.


The cheese balls will be very small, so if you want, you can add an additional 1/4-1/2 Cup of cheese.  Once the meat is around the cheese they are larger.  I used ground deer meat instead of beef and they were delicious.  Also, make sure the saltines are crushed really small, almost to a powder.  You do not want large pieces of saltines.  We ate the leftovers with sauce and pasta the next day and they were even better.  Next time I would serve with dipping sauces too!  Enjoy!

Tender 'N' Tangy Ribs

These ribs are absolutely amazing!  I first made them for my boyfriend to try them out and he said they were the best ribs hes ever had.  They are sooo tasty and very easy to make.  I would recommend this recipe for anyone who wants to try something new and impress the people you are feeding! 

Tender 'N' Tangy Ribs

Yields: 2-3 Servings           Cook time: 4-6 hrs

3/4 to 1 Cup Vinegar
1/2 Cup. ketchup
2 Tbsp. sugar
2 Tbsp. Worcestershire sauce
1 garlic clove, minced
1 tsp. ground mustard
1 tsp. paprika
1/2 to 1 tsp salt
1/8 tsp. pepper
2 lbs. pork spareribs
1 Tbsp. vegetable oil

Combine the first nine ingredients in a slow cooker.  Cut the ribs into serving-size pieces; brown in a skillet with the oil.  Transfer to the slow cooker.  Cover and cook on low for 4-6 hrs or until tender.


These ribs are not your average ribs that are covered with a thick sauce, so don't expect that.  When i made them, the sauce was thinner than a normal bbq sauce.  When the ribs were cooking I ladled the sauce over the ribs to keep them moist and covered.  You can substitute the white sugar for brown sugar as well with these ribs.  I also used baby back ribs instead of spare ribs for this recipe and they worked out great! Enjoy!

Pinwheel Cookies with a Twist

I had 2 cookie exchanges that i attended for Christmas this 2011.  I wanted to make something different and not your usual cut out cookie recipe.  I found this recipe for Peppermint Pinwheels and liked the design, but not the peppermint.  I decided to try and change the flavor of these cookies.  I did 1 batch peppermint, 4 batches strawberry and 3 batches of pistachio.  These cookies came out great!  They are a bit time consuming but are well worth it!  For the one cookie exchange, I individually wrapped them in cellophane and tied them with a ribbon!

Peppermint Pinwheels

Yields 2 dozen

2 1/2 cups all-purpose flour
1/2 teaspoon salt
1/2 teaspoon baking powder
1 cup unsalted butter, softened
1 cup sugar
1 egg
1/2 teaspoon vanilla extract
1 teaspoon peppermint extract
1 teaspoon red food coloring
Powdered sugar, for rolling out dough
Special equipment: 24 lollipop sticks

Sift together the flour, salt and baking powder and set aside.
Cream butter and sugar together in another large bowl. Add egg and beat until incorporated. Add the vanilla and peppermint extract. Gradually add the dry mixture, beating until combined. Remove half of the mixture from the bowl. Add food coloring, beating until fully combined. In waxed paper, roll out dough to form a large rectangle, about 1/4-inch thick. Repeat this step with the other half of uncolored dough with no food coloring. Refrigerate for 2 hours.
Tear out 1 sheet of waxed or parchment paper. Sprinkle the surface of the paper with powdered sugar to prevent sticking. Very carefully, slide the red dough on top of the white dough. Trim edges if uneven and patch if necessary. Roll dough into a log, creating a swirl effect. Place the dough back in the refrigerator and let chill for 2 hours.
Preheat oven to 375 degrees F.
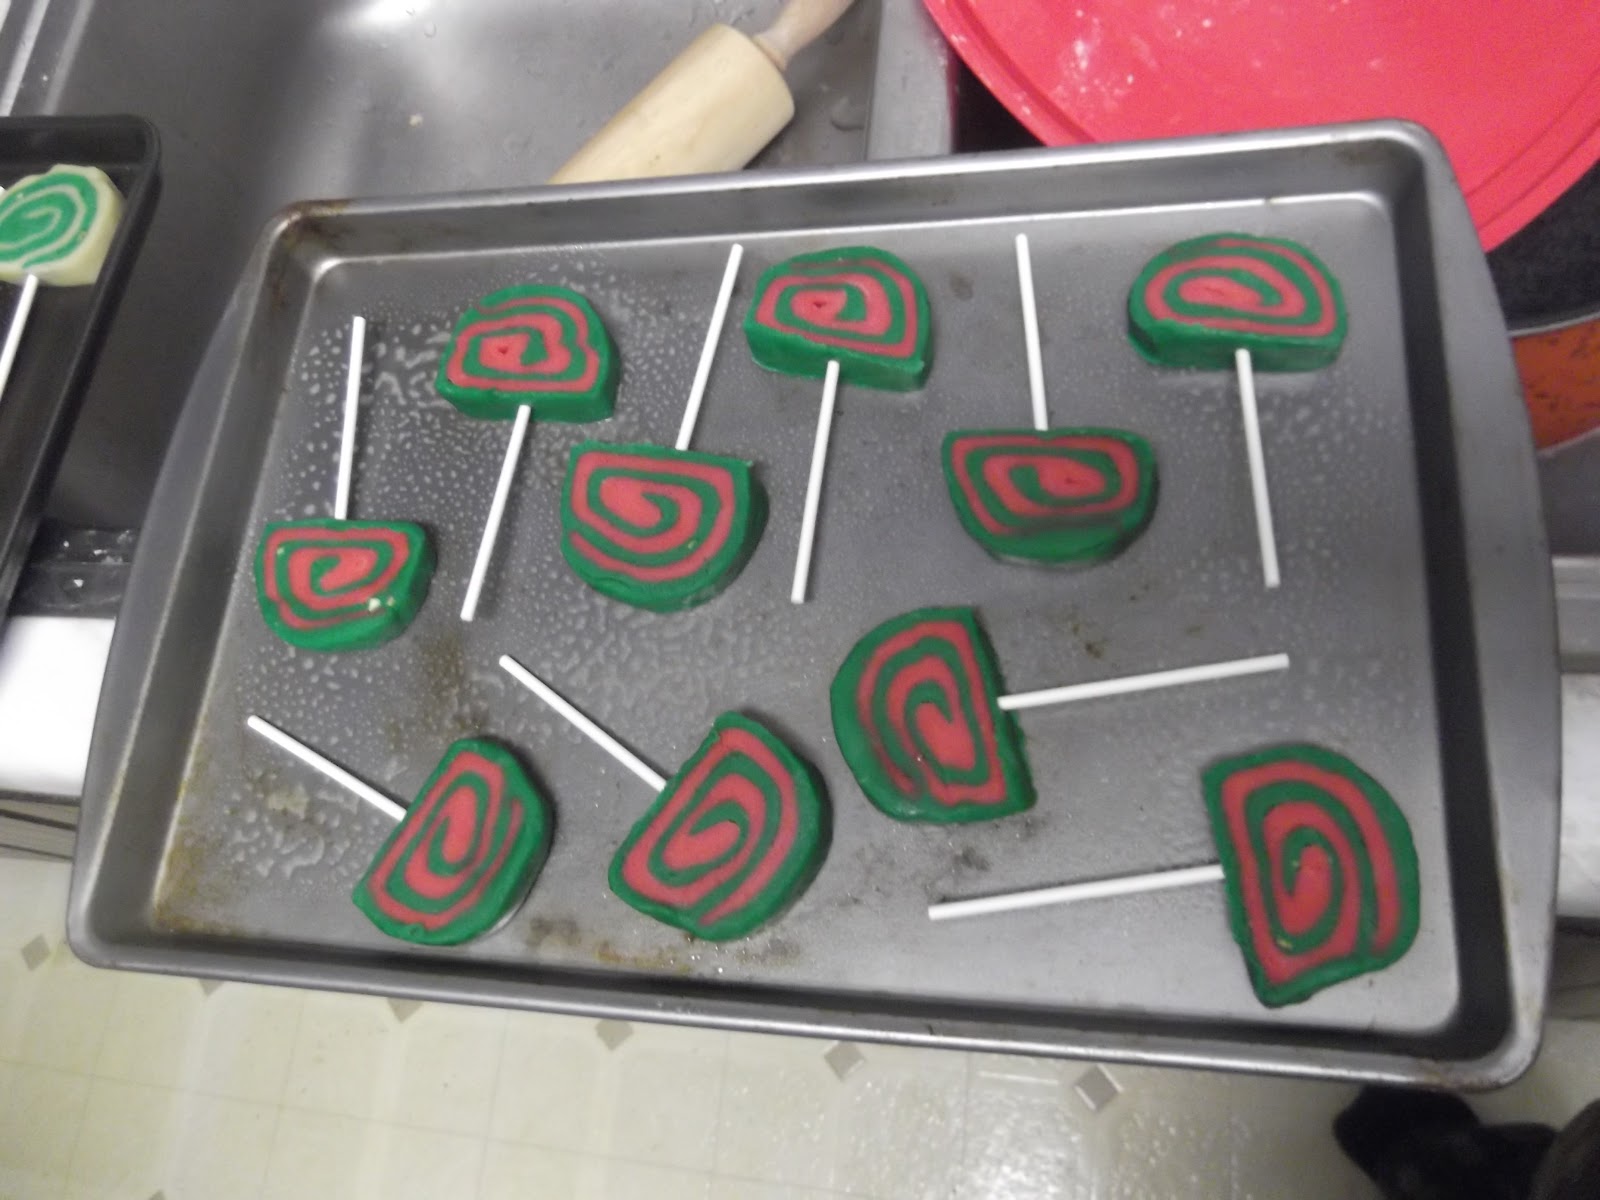
Slice the dough into 1/2-inch slices and place on a parchment lined sheet tray about 1-inch apart. Place lollipop stick about 1-inch through the flat side of the dough. Bake for 8 to 10 minutes. Remove from oven and let cool on a wire rack.


I did a few things differently with this recipe.  Since i had so many cookies to make, i made the dough the night before and refrigerated it.  It was okay to do this except for the fact that the dough was very hard after being in the refrigerator.  I had to work the dough out of the container and knead it with my hands to soften it back up.  The dough was alright though after that. The second thing I did was I added strawberry flavoring instead of peppermint.  I used more than the recommended 1tsp because the strawberry flavoring is less potent than the peppermint.  Just so you know, strawberry flavoring is a pink color so dont plan to add it to the "white dough".  Use red food coloring with it.  I added green and red food coloring to the dough that i wanted those colors.  I wanted to make some of the cookies pistachio, so I added 1 box of pistachio instant pudding mix to the dough i wanted green.  I mixed it well and added a little milk as needed.  I then added the green food coloring. I separated the left over dough from the large roll and made small regular pinwheels to not waste any of the dough.

Overall, these cookies were great and fun to make!  Everyone loved them at the cookie exchanges I went to.  The pistachio ones turned out great and were my favorite!!  Enjoy!